

She severed me well but has gone to a new owner.
Check out the new ride.
1995 4X4 Toyota Tacoma extra cab
I could feel the tear welling up from deep within, watching the old Jeep Cherokee leave my driveway for the last time. After eight good years of hard abusive use, the rock crawler / adventure SUV was on to a new owner. Then I looked over at the Toyota Tacoma in the driveway.
But as I watched the Jeep pull away, I held a grinder in my hand and was in the middle of sanding down the tailgate of my new project – a 1995 Toyota Tacoma X-cab 4X4. The truck was just what I was looking for to replace the Jeep and the build plans had been drawn up. The only problem was cash. I had to sell the Jeep. So with cash in hand, well in the paypal account anyhow, the project was on.

Totally stock 95 Toyota Tacoma shortly after purchase in 2011.
That was more than a two years ago. So far the Toyota has taken me across the country twice, driven the sandy beaches of the U.S. East Coast, taken a few scratches from narrow mountain trails, and has seen more than its share of muddy trails.

In all her glory she celebrates 200,000 miles

The intent for the Toyota Tacoma was to transform it into an exploration / expedition 4X4 capable vehicle while maintaining comfort for long distance travel. Starting with a bone stock unmolested truck of this age was exciting. I spent many hours searching websites for the perfect parts and information on how transform it into the perfect adventure vehicle.
Basic Build list included:
• Painting the bed with bed liner
• Installing a roll up soft tonneau cover
• Mounting jack, shovel, and spare tire in bed
• Installing new heavy duty steel bumpers, front and back
• Finding a way and building a fishing rod storage rack/system
• Installing winch on front bumper
• Installing new suspension system
• Installing new larger mud tires
• Removing the carpet and installing vinyl flooring
• install seat covers
• Building a custom bed rack to hold the kayaks and maybe a roof top tent
• Install a second gas tank for longer trips into remote areas
• And a whole lot of little odds and ends.

New tires, before new bumpers and suspension
But before I could start the build I had discovered that the truck had not had a tune up in its’ 157,000 mile life and had to perform some maintenance. I replaced the plugs and wires, PVC valve, EGR valve, air filter, and oil change. I also changed all of the other fluids.
THE BED GETS MADE
One of the reason’s I went from a SUV back to a pickup was that I missed having a bed. While being able to lock the fishing and hunting stuff inside the SUV was nice, it made a mess of the interior. Bulky items like decoys, layout blinds and deer stands not only dirtied the interior; the sharp corners pulled, tugged and tore at the vinyl and cloth. So this time I returned to a pickup as a base for the adventure mobile.

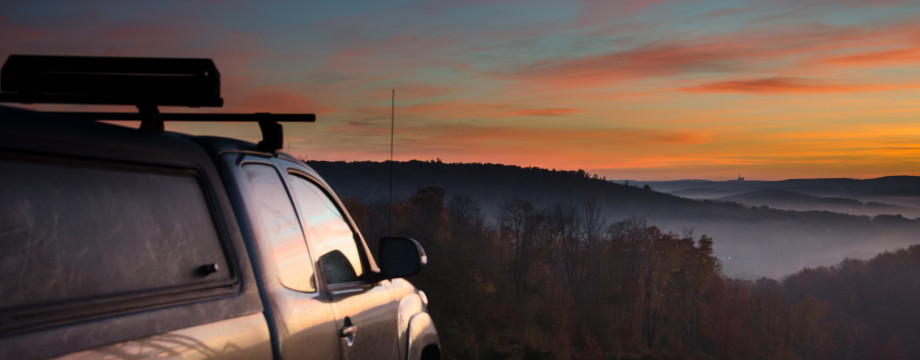
My morning view over Hazel Mountain as I awoke from my truck Saturday Morning.

Enjoying the view
The 95’ Tacoma still had the factory installed plastic bed liner when I gained ownership. I’m not a big fan of these things and it became the first part removed from the truck. The plan was to paint the bed with bed liner and cover it with a tonneau cover.
With my drill mounted sanding wheel, I began the first sub-project within the truck build. I choose the Rustoleum bed liner paint to use on the truck’s bed. Not a lot of thought went into picking this brand; it was the brand that Wal-Mart carries. In my research into the different bands, I did not see much difference between them and went with the one I could buy locally.


Good prep work is the important part to any paint job.

Freshly painted bed is now ready for the jack, shovel and brush axe.
The key to any good paint job is in the prep work. In order for the paint to properly adhere to the truck’s bed, I spent three hours sanding the bed. After the bed paint was removed of all shine and dirt, I wiped it down with Acetone, removing the sanding dust. With a standard house paint roller I applied the thick black paint with little bits of rubber. Three coats covered the inside walls and four coats went onto the floor of the bed. I found that a ¾ inch nap roller holds the bits of rubber better and gives the preferred thick chucky finish. After the bed was done, I repeated the process on the tailgate.
In the end the project cost around $60.00 instead of the $450.00 it would have cost to have it professional sprayed with one of the name brand spray liners. Because I am planning to cover the bed with a tonneau cover, I figured the do-it-myself version would work just fine.
Once the paint was good and dry, it was time to mount the high-lift jack. Anyone who spends time off the pavement in their travels should have a high-lift jack on board. These bumper jacks on steroids can lift the truck in most situations, from getting a tire off the ground to stuff rocks under the wheel getting unstuck, to changing a tire in the most awkward scenarios. Using two brackets by 4Xrac made for the high-lift and 3/8 self tapping screws I mounted the jack to the cab wall of the bed.

Next was to mount a shovel and bush axe. Along the right side of the bed I mounted the bush axe and on the left a shovel using Quick Fist rubber clamps. These clamps come in several sizes and the dimensions given for the small size clamps would perfectly fit the handles.
To keep the important items stored and carried in the bed of the truck on the many future explorations, I chose an Access tonneau cover. I have one of these roll up soft covers on my work truck and have been very pleased with its performance. The frame for the cover fits to the bed using clamps and does not require drilling or screwing into the sheet metal of the truck. The cover is simple to install and took less than a half hour.

The cover is simple to install and took less than a half hour

The cover’s rails are inside the bed allowing the installation of the bed rack.
RACK’N IT UP
I needed a way to carry my kayaks, canoe and other items but did not want to go the standard ladder rack method for two reasons. First was, as I had found out with the lifted Jeep, reaching up the extra height with the boats is cumbersome. And second, by lowering the rack and boats below the truck cab roof line, the wind drag would not be increased; robbing of gas mileage.

The idea of a lower rack was not my idea. It came from looking over and reading about some of the other expedition rigs on www.expeditionportal.com. This site has been a good resource for information concerning this build. My idea was to use a Yakima roof rack system and adapt it to fit the bed rails of the Toyota. By purchasing the individual pieces, I was able to come up with a system that would work for my needs. I installed the Yakima roof tracks along the bed rails using self tapping screws.
List of Parts Used:
Yakima Control Tower Roof Rack Tower
Yakima Control Tower Tracks with PlusNuts
Yakima RoundBars Roof Rack Cross Bars

One of many configurations of the bed rack.
The Yakama landing pads and cross bars completed the rack. The landing pads slide up and down the tracks allowing unlimited adjustments. By using kayak mounts, bike mounts and a ski mount for fishing rods, the rack has been a big asset to the carry capacity of the small truck.
The longer 16′ canoe proved to be just too long to hang out the back of the truck. So I went back to Yakima and mounted a rack on the top of the truck cab. Took a little nerve to drill holes into the roof of my truck, but with the right parts the rack turned out perfect.
List of Parts for the Roof Rack
Yakima Roundbars Roof Rack Cross Bars
FRONT BUMPER

Blue Lake Off Road Front Bumper
In my search for a winch bumper for the Toyota Tacoma, in my internet search, I came across Blue Lake off-road in Georgia. What I liked about their bumpers is that you can order it ala cart. On their web page, you start with a basic bumper and add to it to fit your needs and wants. Each bumper is custom built to your specifications.
Like a kid writing his Christmas list, I clicked on the options for the bumper. I added D-rings and LED turn signals and they even were even able to configure the winch mounting to fit for my Champion winch. In keeping with a simple but functional theme of the truck, I choose not to add the large loop bars. The waiting was the worst part. Since each bumper is built according to the customer’s order, the delivery takes longer than if it was an off the shelf item. But the wait was worth it.

Using a rope tied to the hood latch and jack stands I was able to set the bumper in place.
To save time, I drove to the airport in Hanover, MD and picked the bumper up, rather than wait the extra few days for the delivery. Once home, I had a few hours of daylight left, and went to work. The old chrome stock bumper came off in quick order, but trying to lift, hold in place and mount a seventy pound bumper is a daunting task for one person. Using a rope tied to the hood latch and jack stands I was able to set the bumper in place. However, I quickly discovered that the mounting brackets were not pre-drilled and would require some welding. I called on my neighbor for the welding.
Using clamps I mocked up the bumper location and marked the welding points on the brackets and bumper. Once the brackets were welded in place, I hung the bumper in tree next to my shop and gave it a thick coating of the same bed liner paint I had used on the bed of the truck.

One last Alaskan Exploration leads to a big woops, But thanks to the Blue Lake bumper and winch, I was able to get the truck back onto the road.
REAR BUMPER

A little clean up and we welded the junk yard bumper on the tacoma, looking brand new.
Searching E-Bay I had found the perfect tight fitting rear bumper. With one click the order was placed. Two months later, the bumper had not arrived. The builder went bankrupt and I was left $450 lighter and no bumper. Try two – for $30 I purchased a used rear step bumper. A quick sanding and three coats of bedliner and the bumper began to shape up. To light up the dark morning back ups on the boat ramp and tight trails, I installed a set of round lights and wired them directly to the stock reverse lights.
NEW BOUNCE IN MY STEP – OLD MAN SUSPENSION INSTALLED
After waiting for two months for the Australian built suspension from Old Man Emo to be delivered from a vendor in Utah, it finally arrived. In haste to get it installed, I started late on a Friday evening and by the time it was too dark to work, I had the passenger front installed.

I attacked the driver’s front early Saturday morning before the sun broke the horizon and with frost still on the windshield. The nuts holding the strut and coil spring on the driver’s side were rounded off smooth from the previous mechanic. It took a sawzall, grinder and three hours before the old strut was removed and the new one was bolted in place.

The Tacoma doing what she does best.
With the front done, I thought the hard part was done. The rear springs would be an easy remove and replace. Or so I thought. The rear shackles would not break free from the springs and I was done for the day. Again I had to wait for parts to arrive. I called and ordered new rear leaf spring shackles.
Paying for the extra quick shipping the shackles arrived a few days later and in the darkness of the evening, I set the springs under the truck. Woops again. The vendor I had ordered the suspension kit from said the rear leaf springs will fit my truck and match the front lift of 3” to the truck, but with the truck resting on the tires, the rear stood 5” taller than the front. The Tacoma looks like it is ready for the drag strip and not the trails of adventure.
The vendor continued to tell me that they were the correct springs and it took three phone calls and a few photos before they agreed to take the springs in return. They did not have another option for rear leafs for the Tacoma. My solution was to add the two extra leaf springs from the OME pack to the stock springs. A year and over twenty thousand miles later the springs have worked flawlessly.
TIRES
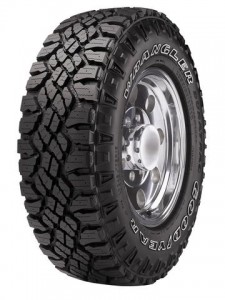

Out with the wimpy stock tires and on with the Goodyears
Tire choice is always a big decision on a build like this. I’ve been a big fan of the BFG MT’s for many years and have owed several sets on a few different vehicles. However this time around, because this truck build is geared toward a more long distance traveling truck, I went in search for a quieter and better all-around on/off road tire.

Tacoma in snow in Alberta CA
The search for the perfect tire began on the internet. I posted the question to my newly found friends at expeditionportal.com. Several of the travelers on the site have had good success with the Goodyear DuraTracs and had good things to say about them. Investigating the DuraTracs they sounded good, but I was not sure I was ready to give up on the mud digging traction I was used to.
According to Goodyear’s write up, the DuraTrac has Tractive Groove Technology that provides enhanced traction in deep mud and snow while the tire’s combination of highly angled center tread blocks and zig-zag microgrooves offers enhanced lateral stability and traction in rain and snow, all while reducing road noise.

Many miles later they are still performing
To enhance the toughness and longevity of the tire, the new DuraTrac features a rugged tread rubber that helps resist tread block chipping, chunking and tearing, especially during heavy loading and towing applications. Wrangler DuraTrac also features a rim lock that helps prevent wheel slip for minimal balancing throughout the life of the tire.
It was not until I drove the 400 miles to Kentucky on a deer hunt that I totally gave up on running another set of mud tires. The current all-terrain tires rode smooth and extremely quiet compared the mud tires I used to.
TIRE UPDATE:
After over 40,000 trouble free miles on the DuraTracs, I was given the opportunity to test out a set of Cooper’s STTs and am currently running a set on the Tacoma. They have a little more road noise than the DuraTracs, but overall I’m really happy with there performance. Testing the Cooper STTs in the mud.

Life is no fun staying clean
EAISER CLEAN UP – NEW INTERIOR
A truck used for fishing, hunting, camping and such does not need carpet. I’ll go even farther and say they should not have carpet. Carpet gets dirty easy, holds moisture and will cause the floor of the truck to rust. Been there, done that in the last Jeep. It could just be me, but it seems like more often than not, when I climb into the truck, my boots are muddy.
Vinyl floors clean up easier and will not stain like carpet. So with that in mind, I ordered a vinyl floor for the Toyota from Auto-interior.com. Including shipping and extra cost for the blue color, the cost came to $170.00
The day the new floor arrived; I unrolled it and let it relax on the floor in my living room. The directions mentioned this, but I guess I should have read the directions more completely because the install did not go quite as planned.

The flooring did not seem to fit very well, and as I found in the install process, I’m not the best vehicle flooring installer. A few cuts were made a little short, and the covering does not lay flat over the transmission hump. A key in the directions, as I read them after the install was complete, was to start the layout at the hump. I found the floor molding to be a little lacking, and used the only molding readily visible, the seat mounting tunnels, for alignment.
If you have the patients, and take your time, the level of mechanical ability of this project is not very high, but if you are like me, and have a tendency to bull your way through a project, this may not be your best project to take on yourself.

The good thing that did come out of customizing the interior to my liking and to better fit the use of the truck was the installing of the seat covers while the seats were out of the truck.

In the original plan for the build, I was going to have the seats rebuilt. But to stay within budget, I chose to go with a set of neoprene covers instead. For those that have spent any time with me hunting or fishing, they know, and I get ribbed regularly for this, I seem to get wet no matter the adventure. One of my hunting buddies loves to tell the story of me finding the only mud puddle in a dry corn field and going in over my hip boots.
Cloth seats do not work for the summer time wet wading fisherman, or the muddy duck hunter. In the short time I have had the truck, the original cloth seats had already begun to show dirt, and have been soaked a time or two. From Amazon.com I ordered a set of custom fit Neosupreme fabric covers from CoverKing. Including shipping the covers cost $152.00. Only time will tell if they hold up as well as the covers costing a hundred dollars or more.

Installing the covers while the seats were out of the truck was a breeze, only taking a few minutes. The CoverKing covers fit very well and tight, but not too tight over the seats. I did leave a few dirty finger prints when re-installing the seats in the truck, but they easily wiped clean.

Easy wipe down interior
PROTECTING THE INVESTMENT
I was on my way to Alaska. I had taken a summer job as an off-road adventure guide. But first I had to drive the 3,700 miles from Maryland to Alaska. The drive quickly turned into a trek. For fourteen days I would drive and explore the northern parts of the country from one coast to another.

I quickly realized the possibility of me not pushing the truck a little too far along on a trail in Montana or North Dakota was out of the question. In prep of the trip, I ordered a full belly pan kit from www.budbuilt.com. The kit comes with a IFS skid, bellypan, and rear crossmember and weighs 125 pounds. The $575 cost is well worth the insurance of not punching a hole in the transfer case or transmission miles from anywhere.

Not fully protected yet, the Tacoma was fitted with a set of rock sliders from trail-gear. Made from 1 3/4″ X .120″ wall DOM tubing, the welded to the frame sliders not only protects the truck rocker panels but as I learned in Alaska make great winching points. I had slid the truck off a snow covered road and winched the truck sideways using the driver’s side slider as an anchor point.

The 95 Toyota Tacoma made it over 9,000 miles across the country and back with no issues, except for a few driver errors.
More info on the Tacoma

Enjoying a fall sunset on the Outerbanks of North Carolina
Check out the new ride.
Help Support the build of the new truck by purchasing one of our photogrpahs for sale

